Showing posts with label nails. Show all posts

Monday, January 27, 2014

Seahawks Nail Picture Tutorials

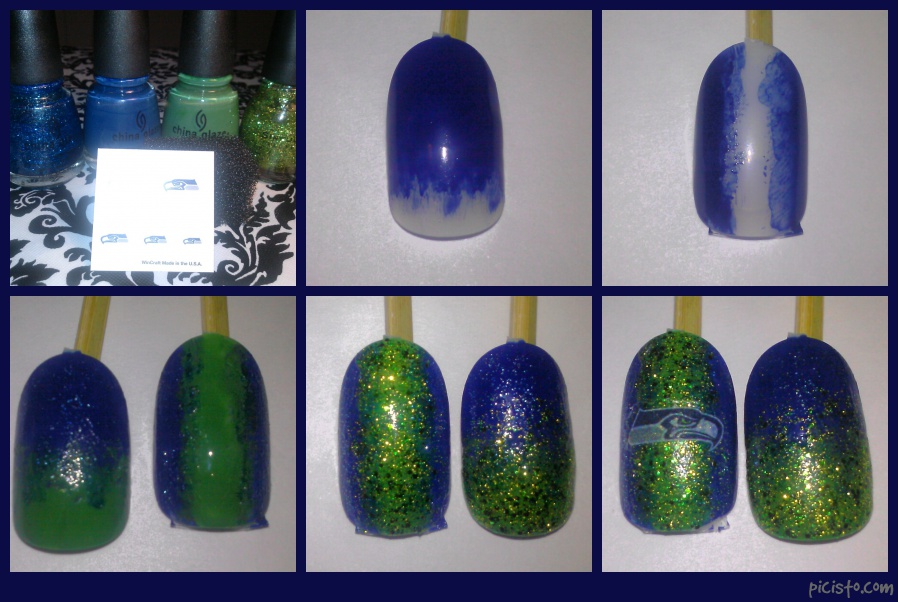
Like I had mentioned in my last post, I did a quick picture tutorial to show how you can recreate some of the looks I did to rock them next Sunday! All products used are pictured and listed right after each tutorial (left to right, back row to first row).

Now, for the first manicure tutorial, I had originally done the logo and "12" using acrylic paints and by following this amazing nail sticker method video. This is also the same method that I used to make the players' face. If you are good with your non-dominant hand, just do it freehand. For time/tutorial sake, I used some nail tattoos that I found at Party City and skipped the "12" because Im sure everyone can do a 12. Lol


Original Seahawks manicure


Products:
Green, Blue, White, and Black acrylic paints (originally used to make logo and "12", but only used white for this tutorial)
Kiss Blue nail art striper (only used the brush)
China Glaze Dorothy Who
China Glaze First Mate
China Glaze Starboard
dotting tool


Seahawks Manicure 2
 
This look is basically a glitter gradient and this has got to be the best video I have found on how to achieve it, except I add the color directly to the sponge instead of pouring it on a plate. I also used the solid green at the tip before sponging the glitter so it could stand out more.  Again, I used the same logo tattoos


China Glaze Dorothy Who
China Glaze First Mate
China Glaze Starboard
Sinful Colors Call You Later
Nail Tattoos
Cosmetic Sponge


Seahawks Manicures 3& 4
 
For the next two manicures, I used the exact same products so no need to list or picture them twice. The one thing I did forget to picture was the rhinestones. You can use green or silver, it doesn't make much of a difference. 
 
Kiss Blue striper polish (only used the brush)
China Glaze First Mate
Sally Hansen Celeb City
Ssalon Perfect Loopy Lime (I believe that's the name, name came off)
Kiss Lime Green striper polish (only used the brush)
Nail Tattoos
2mm and 3mm rhinestones


I hope you guys love these looks, try them out, and share!

Oh, and GO HAWKS!

Tuesday, January 21, 2014

NFC Champs- Seattle Seahawks!

I know that I've been gone for almost a year, but I had decided to take a break from makeup due to a great loss in my family and other personal issues. I've only worked with about 10 brides this past year whom have been either family, friends, or a friend of a family member. It's really hard to concentrate and focus on others' happiness when you are trying to overcome the loss of a family member.

With that out of the way, let's get down to business! A few months, I happened to see a picture that one of my friends liked which showed up on my Facebook news feed which looked so familiar to me. It ended up being a copy that a nail salon had done of my original Seahawks nail design! As strange as it is to see others doing your design, it's kind of an honor knowing that it served as an inspiration to someone. I later went on Google and Pinterest and saw how many times people had liked and repined the design, I seriously lost track trying to see how many times it had been repined. Plus, my original post has been viewed on over 4,000 just in the past month! Wow!

I had done 4 other designs since this season started, so I wanted to share them on here so fellow 12th women can rock their Seahawks nails during for the Super Bowl! Also, I have a tutorial on how to achieve some of the looks because I've had quite a few people ask me how to recreate them.

Enjoy and GO HAWKS!!!


My vector portrait attempt! lol
Top: Earl Thomas and Marshawn Lynch
Bottom: Richard Sherman (lol) and Russell Wilson
Seahawks nails with portraits

Glitter gradient Seahawks nails

Seahawks nail art

Seahawks nail design


Saturday, February 2, 2013

49ers nails

Since my sister is a huge Niners fan, I did these nails on her the other day for this weekend's big game. May the best team win.

49ers Nails

Sunday, January 13, 2013

Seattle Seahawks: Beast Mode!

I have to confess, I'm not the biggest football fan. I'm more if a soccer gal, but that doesn't mean I won't support my local team!  :)

Super proud of the Seahawks, they have given us a great season and still have more to give. I just know they'll make it to the Super Bowl! Meanwhile, watch out Atlanta, because Seattle is bringing it this Sunday! BEAST MODE!

Here are my nails for this weekends game, don't forget to tune in!


****UPDATE 1/21/14****
 
Since the beginning of this season, I have made 4 more designs which you can see on my recent post. I will be making a tutorial on some of the designs in the next few days and will link it both here and on my other post. Enjoy!


** UPDATE 1/27/14**
Blog post with the picture tutorials is now up and can be found here.


Go Seahawks!
 
Seattle Seahawks nails
 
 Seahawks nails
 
Seahawks nails 

Tuesday, October 16, 2012

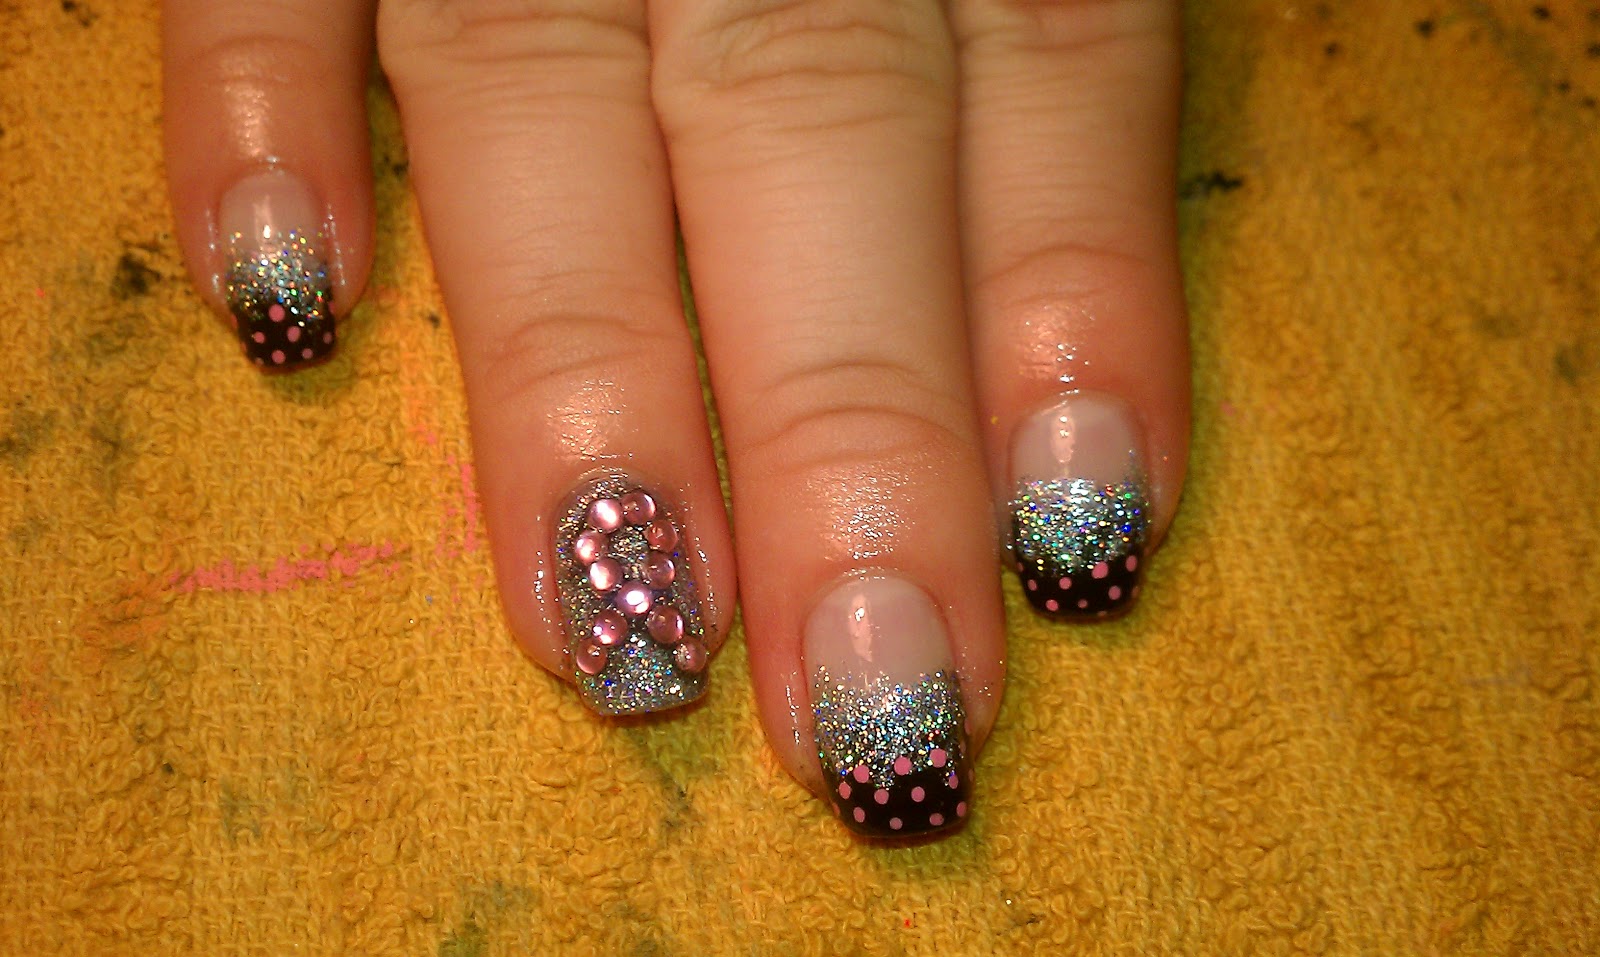
Breast Cancer Awareness Nails

 
I knew I needed to post something on here soon when I had friends calling to ask if I was still alive. Yes, I am alive, but have been completely swamped with work these past few weeks that I haven't had time to post anything. I do have a couple of looks that I will be posting pretty soon along with some other stuff, so stay tuned. Today, I wanted to share some of the nail looks which I've done these past few weeks in honor of BCA month which is in October. I love taking inspiration from work others have done and just add a twist to it. So, I posted the picture I used for inspiration first and then the look I did. Hope you guys love them!

BCA nail inspiration #1

My take on the BCA nail inspiration #1


This is by the beautiful Ms Robin Moses, check out her YouTube and blog. Obviously, I was not going to do the skulls!

My twist minus the skulls plus a bunch more glitter!
 

For this look, I had tons of issues trying to upload the original photo I used for inspiration, so I will just link it! My Sweet Nail Art Blog

Monday, August 13, 2012

MUA problems! + tips


So yesterday was Stephanie's QuinceaƱera, photos coming soon of the final look. Man, it was a long day! I got to her house around 8am and the lady doing the damas' (maids or court) hair was already working. Stephanie's hair and makeup took me a total of about 2.5hrs to do! Just curling her hair took me about 45 minutes because she has so much hair and its super thick.

Of course she's 15 and her best friends were part if her court, so she laughing and moving all over the place while I was doing her makeup. What does this mean to me: mascara all over the place, smudged eyeliner, crooked lip liner, etc. Basically having to re-do many things. Lol. It's OK because she's like a little sister to me and all her friends were there. For anyone who is thinking about hiring an MUA for a special event or if a friend is doing your makeup or whatever, here are a few tips (more like rules) to make the application process go faster and smoother for both you and the MUA.

1. Start of with a clean face. If you can, have your favorite moisturizer on already. You never now how a new moisturizer will react with your skin.

2. If we haven't asked already, PLEASE inform us beforehand of any skin allergies or if a certain brand or product makes you break out! The last thing we want is to irritate your skin.

3. When applying mascara or eyeliner, Let us know if you need to blink! We promise we'll stop to let you blink a bit. If you blink while we're applying them, we might accidentaly smudge the liner or mascara and have to start over again! We might even poke your eye and make your eyes water which is even worse!

4. Tip 3 applies here too! Please stay still if we're applying false lashes and follow what we say, as every MUA has a way which works best for them. If you move the lashes might end up crooked, not glue properly, or we might get glue all over and glue your top and bottom lashes together!

5. Actually, just stay still in general. It's OK to talk, we'll let you know if we need you to stop for a bit. Enjoy getting pampered and relax.

6. Let us know what type of look your going for and give a few examples, that gives us a variety of options to work with. The look might not be the same on you as the person/model may have a different skin tone, eye color, eye shape, facial features, and face shape. All of this contributes to the overall final look.

7. I guess this is more like 6.5. How your final look is now to how it looks in photo are two completely different things. General rule of thumb: if you feel like it might be a little bit much, it might be just enough for photo. So keep that in mind if photos will be taken.

8. Give us space to do our work. A counter, desk, or you dining room table is fine. Chances are you don't have a high director's type chair like we love to use, but if you have a stool or a tall chair, perfect. If not, a regular chair is fine, but it can really take a toll on our back when we're doing a party of like 4 or more.

9. If we're doing hair and makeup, please give us and yourself enough time. Depending on the makeup look and how elaborate the hair is, plan for about 2 hours... it might be more like 1-1.5. Just play it safe. Same for large parties, give your MUA examples of the looks so they can give you an estimate on how long it will take.

10. Please, please, PLEASE let us know if there is something you don't like or want to change of the look! You want to look beautiful and we want to help to make sure you're completely satisfied, but we can't if you don't let us know what you don't like. In my case I will always do a makeup consult about 2-3 weeks before to try out different looks and hair and take some photos for you to compare. This is when you NEED to express your concerns so we can make the changes.


Well, I really hope this helps you out and makes everything go smoothly for you and your MUA.

This is the look I wore yesterday to the party, keep in mind that this is +12 hrs after I applied it. Oh, and excuse the shiny face, I had just gotten home and did not want to add more powder... I just wanted to go to bed! If you look close in the first picture, I had already started taking one of my lashes in the inner corner when I realized I hadn't taken a picture yet! Lol.


These are the nails I did, completely blinged out and the color matched my shoes perfectly!The color is Frostbite by China Glaze.