Friday, September 7, 2012

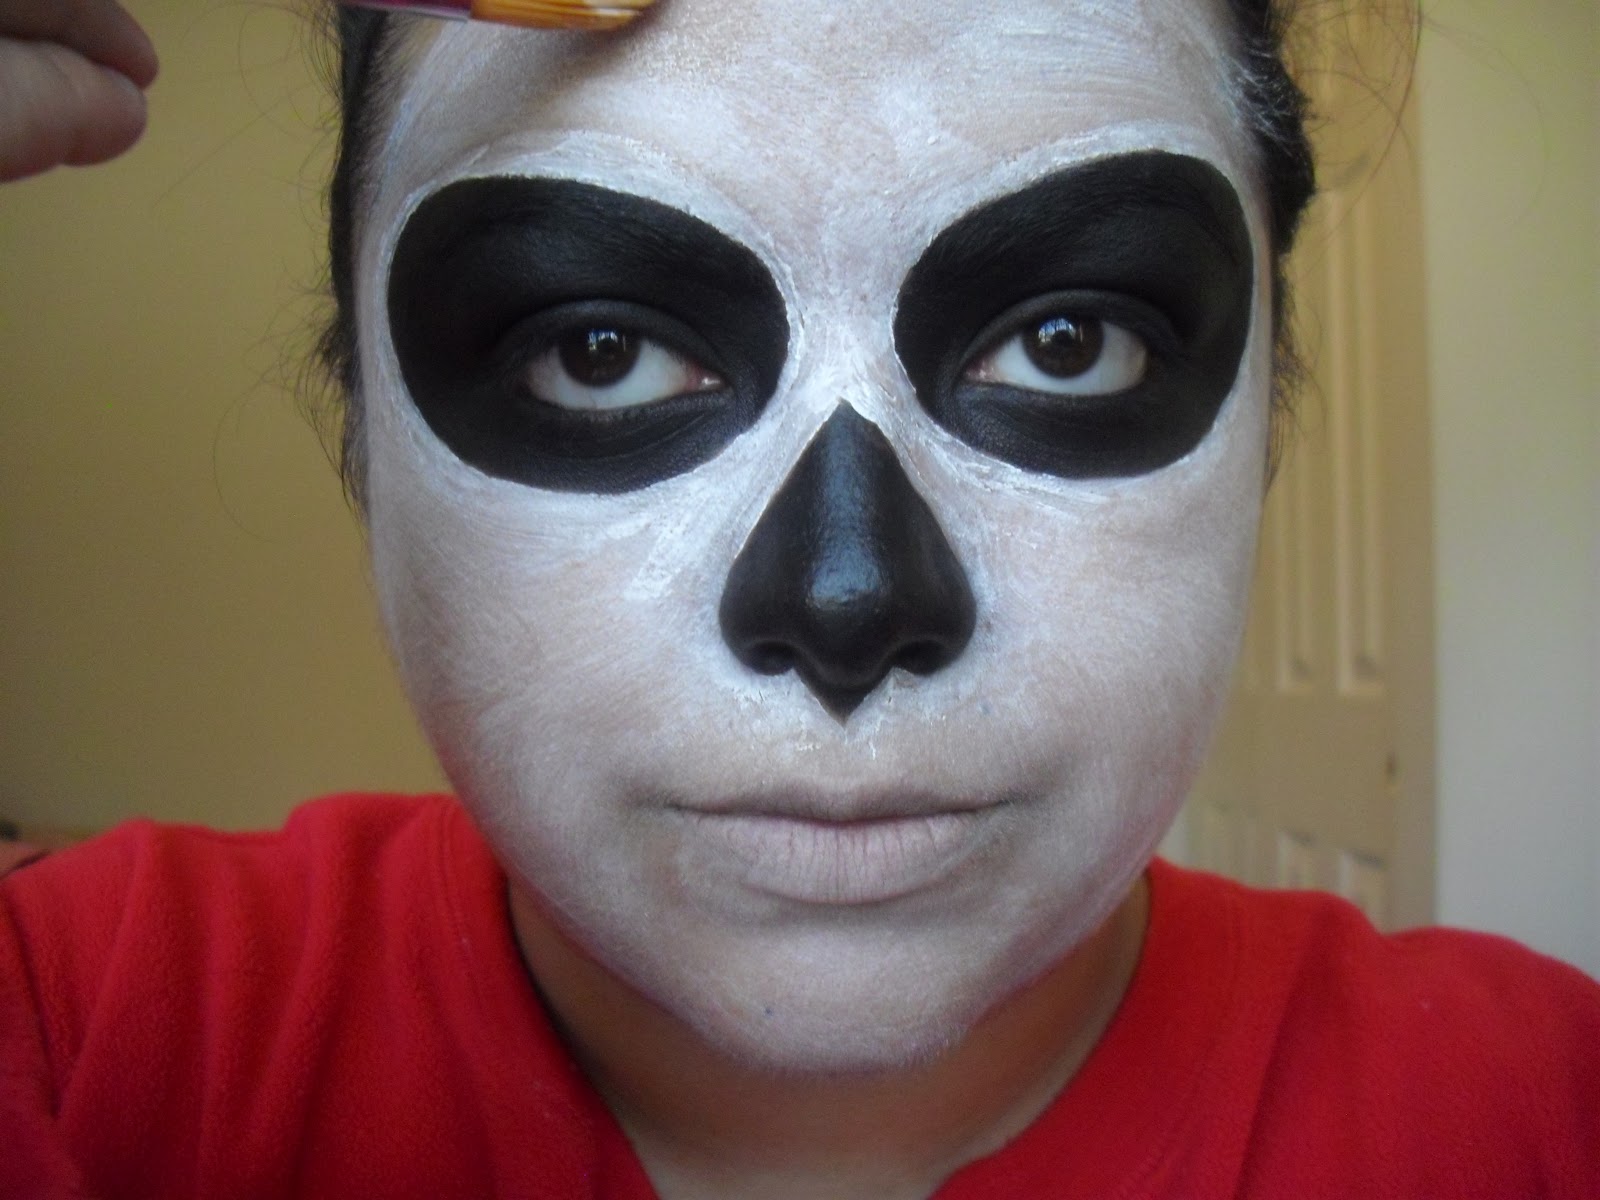
Simple Sugar Skull (Calavera)


With Halloween coming up, here is a simple sugar skull look you can try out. Once again, I start off with no makeup!

 
Things you will need:
Paint brushes (preferable for face painting)
Black face pain
White face paint
Black eyeshadow
Black eyeliner
Translucent setting powder
Powder and fan brush brush
Concealer
Face primer
Cotton buds and pads
Water
Face wipes


Since I have thick dark eyebrows, I started by partially gluing my brow (more on how-to later) and using moisturizer.

With black paint, I first made the outline of the eye shape I wanted. Don't worry if it is not perfect, you can fix it later.
 
Once you have the shape you want, go ahead and fill it in.


 Now using a black liner, line your water line.

 
Go ahead and set it all with a matte black shadow. At this point it still doesn't have to be perfect, just as close as possible to the shape you want. Don't worry about fall out or the edges, we'll fix those in a bit.

 
Now, going in with the black paint again draw the outline of the nose shape you want.


Fill it in, but don't worry about getting it perfect yet. Once you have filled the shape you want, go in with a smaller tip brush to get it perfect. Go back in with the black shadow to set the nose.


Using a fan brush, dust of any excess shadow from your eyes and nose. Clean off all of the fall out to get the skin ready for the next step.

 
Add either a primer or some moisturizer.

 
Use a concealer which is lighter than your skin tone to mute your lips.


Clean off your fan brush and go in with a translucent powder to set the concealer.


I used a mixture of white face paint and moisturizer because this paint really dries my skin. So, I had to do a few coats to get a opaque finish. Anyways, using the paint, go ahead and outline the eyes and nose. Now, you can really go in and make everything perfect.

 
Go ahead and paint the rest of your face and neck. Since I was just going to take a shower after this, I only did my face. I had to do about 2 coats since I mixed in moisturizer. I could've gone for 3 coats to get it perfect, but for demo purposes, I just left it.


Go in with the translucent powder and set the white paint.


To draw the mouth start about 1.5-2 ins past the outer corner and draw a horizontal line to the outer corner of your mouth. Do the same on the other side. Starting at the cupids bow, start drawing multiple vertical stripes.


On your forehead, draw a spider web like so, and connect the lines.


On your chin, you can draw whatever you want. I did a lotus-type flower, but you can draw a rose or smaller spider web.

 
I added some dots and this is what I ended up with. For a super simple or kid's look, you can stop here, but I wanted to add some more.

 
I added a swirl design to add a bit more definition to my cheek hollows


Once again, you can stop here, but I still wanted to add some more bling. :) I decided to add a rhinestone sticker thing in the center of the web.

 
Still not enough! So I added different sized swarovski crystals around the eyes, chin, and on the swirl thing. You can use eyelash glue to get them to stick. Instead of using Duo, I went with a glue which remains tacky even after it has dried.


Tah-dah, you're done! :) Of course, you can add more details, different colors, lashes, glitter, etc... but I just wanted to keep it easy.


Labor Day Weekend

Once again, as summer comes to an end, I am super busy. So this weekend, we decided to go up to Camano Island State Park. I love this place, especially at night!


Friday, we had a bonfire at home with my cousin and her husband. We had her husband try smores for the first time too. Plus, the moon was super pretty... and it was a blue moon too!


Saturday we were in Camano Island and just relaxed. Oh, and we had Empanadas from Argentina. Yum!


Monday, I had a birthday party I was doing makeup for! It was for a 12 yr old and about 9 friends. It was such a fun idea, they did like a "spa" party. They were getting manis, pedis, facial masks, hair and makeup. This time I took my sister with me to help out and she did a great job. To thank her, we went out to our favorite place down in Tukwila after the party. Hopefully I can get some of the photos to show you guys.

I think that has got to be one of the things I hate most about what I do... waiting to get pictures back. Maybe I might be a bit too impatient. :)

Tuesday, I went to get my hair done. If you guys are in Snohomish county and looking for an organic salon which is cruelty free and doesn't use ammonia, got to Hair by Elemi. You can check out her website:http://www.hairbyelemi.com/   She has a cute little salon in her home and does great work!


After she was done with my hair, I did one of her client's makeup. I don't want to brag, but she looked so great, her husband probably didn't recognize her when she got home!

before
 
after


I have some very exciting things coming up these next few weeks, including a runway show tomorrow night. Eek, this is one very exciting September! Oh, I also have a Halloween tutorial which I'm trying to finish editing and should be up by Sunday or Monday... Maybe tonight if I don't paint my nails. :)

Wednesday, August 29, 2012

Awesome week

So this past week has been crazy busy but very fun!


crazy long falsies
 
 
Over the weekend, I had the chance to meet Judy from ItsJudyTime on YouTube who lives in the same town I do. She has both a beauty channel and a vlog channel. To be perfectly honest, I don't really watch her beauty videos... I would really recommend them for girls who are starting to get into makeup as she uses many drugstore brand items and explains her steps perfectly. I prefer her vlog channel which is ItsJudysLife! She and her husband, Benji, are hilarious: I love them! Go check her channels out.

 
Sunday, I had a two different gigs... working on permission from the photographers to show you a few pictures!

I also had the chance to meet with DorothyInez, a Makeup Artist from the south Sounds who works with Motives by Loren Ridinger. I met up with her before a class she was going to teach because I was going to get one of her train cases. I'm tired of carrying around another bag for my hair things because my train case is a bit too small. besides that, I don't want to pay $200+ for a case which is just a bit bigger than mine, that's just crazy!


Anyways, back to my story. Since they were still setting up for the class, she introduced me to one of the Motives mentors from Miami and they showed me some of the products they have. There was this cake tier looking thing with different correctors and colors: they custom blend your foundation! How cool is that?! Plus, they are very affordable cosmetics! My favorite was definitely the Motives for La La line which just launched. You know former MTV VJ La La Anthony: married to the oh-so-cute Carmelo Anthony.


The pigmentation was great and there was a coral lip gloss which I HAVE to get my hands on. Oh yes, I will placing an order soon! You can check out DorothyInez's site for more info in her and her work, you can even look at the Motives line. Oh, and any future brides in the south Sound (Seattle on down), hit her up, she's very sweet! Her site is www.dorothyinez.com

Later, I had the chance to work with probably the nicest photographer I've ever met for some Senior portraits: Vaughn Tanner. His work is really nice and he is great. It was definitely one of the best photo shoots I've been a part of. Of course, the girl he was shooting was very cooperative while I was doing her hair and makeup and her mom was very sweet too. Hopefully I can show you guys a photo from the shoot, Vaughn did an amazing job!

Once again, anyone in the south Sound, hit him up for photos! His site is www.throughalens.net


Have some pretty fun things lined up for next week, of course, I'll try to get pics up on those too! The photos I added today are just examples of two different looks using the exact same colors for both looks. I used 2 different greens, 2 browns, a highlight color, and some black liner... that's it!

Wednesday, August 22, 2012

Scaries! :O

I was online looking at some makeup gigs, one of which asked for a corpse look. Since I havent done one in a while and I had my afternoon open, I decided to do it. It turned out more like a zombie. While I was at it, I wanted to try a look that I had seen on YouTube but hadnt had the chance to test.


before

For the first look, my brother Juan was the model. In this, since he was going to take it off right away, I only did his face. I ran out of many SFX things which I havent restocked. Since I didnt have the materials to make some fake blood, I just mixed some black & red paint, water, and glycerin... but I was not thrilled with how it turned out.


after

For the second look, we had to conceal his brows, but I didnt have spirit gum or enough modeling wax to cover his brows. So I tried the glue stick method... yeah, didnt work. I really wanted to do the look, so I tried it on myself since my brow is not as thick as his.

before... this will be one of the ONLY times you will see me without a single drop of makep


I still ended up concealing my brows with the glue stick becase I wanted my brows higher up to give me more woring space for the look. While watching the video, I thought the look might be harder than what it actually was. Here's the link to the video where it shows how to creat the look step-by-step: http://www.youtube.com/watch?v=RphmwMqkToo   If I had white contacts, this would be even more creepy. I highly doubt my family will be able to sleep tonight after they saw me. My sister might have gotten a heart attack when I texted her the picture: she has a major clown phobia! When showed my dad the pictures, he didnt believe it was me! Oh the power of SFX makeup! Actually, the power of makeup in general!


Tuesday, August 21, 2012

Poppa bear!

This is not beauty related at all, but I wanted to share because I always get asked by clients about my family and if I have kids. No, I don't have kids. I've got a very needy dog and that's about as much as I can handle right now! :D

This is my little poppa bear, Goliath! He's a 3yr old, reddish brown, Apple head Chihuahua. My sister and I adopted him him while I wad going through a very rough breakup. So instead of crying, I decided to focus my attention on something else.

He was 10 weeks and weighed just over .5lb! The prettiest little face, stubby legs, and droopy ears: I fell madly in love with my baby boy.

Now, I know what some are thinking, " It's a dog, not a kid!" I bottle fed him until he was able to eat softer food on his own. I am the one who goes all "momma lion" when I hear him yelp, cry or growl. I cuddle him in the middle of the night when he's crying scared to death of the wind, rain, and thunder storms and doesn't want to stay alone in his bed. I hold him close all night and try everything I possibly can to make sure he's ok when he's sick. Comfort him at the Dr's. These are things a mother does, right? Just that my kid can't talk, walk on two legs, and is more hairy than most kids! :D

So, I present to you, my child/dog! My favorite is definitely the one where he's "helping" my mom with a puzzle.


Monday, August 20, 2012

Busy busy gal

I have been crazy busy these past few days, if you could only see the major dark circles I've got going on! Thanks to concealer, you can't. :D Today, I didn't even wear falsies! For me, that rarely happens. I have very small lashes that seriously look like an awning! You know the things that go over a patio or building door to make a shade: awning. They even droop down the same way!  I can curl the living day lights out of them, but at the first sign of mascara, they become a thick, clumpy, droopy mess.


I know I am not alone here, there are other ladies out there with the same problem. For those of you with the same issue, here's a tip for if you don't want to or haven't worn false eyelashes: eye liner. Preferably a liquid liner with a brush tip, not felt tip. I love to use Urban Decay 24/7 liquid liner or a soft black from NYX. You just brush it lightly as if you were applying marcara and wait for it to dry. I will usually apply it before I start doing my shadow and concealer because it might splash on the top of your cheeks. When I'm done with my shadow and the lashes have dried, I curl them and apply a couple coats of mascara. VoilĂ , lashes!

Its just an extra little step which makes a huge difference... but I still love the drama of the false lashes! :) Here'e the look I did today without falsies. Super simple look, just a bit of pop with the silver liner. That's it, nothing to exciting, I was too tired today.


Saturday night, I was at the Bellevue Square Mall's Macys and got a sample of the new Urban Decay Naked foundation to try it out. It's a medium coverage foundation which is definately buildable. I mixed mine with my moisturizer because, luckly, I just need very light coverage. I'll keep trying it out and see if I want to get it. So far, I HATE THE SMELL!


Thursday, August 16, 2012

Yay, clean kit!

So I decided to clean my kit, even if I do have to pack it again tomorrow. I just cant stand seeing it by my door with all my things still inside. This is what it was like after a crazy day of work this weekend..


and  after!


I always clean my brushes on the spot, I never have a dirty brush with me. All the items that are still in my kit are items that I use for every look: brush roll, a few lashes, gel & felt tip liner, brow gel, mascara, manicure scissors (for lashes), my favorite lip gloss palette, brow powder palette, transluscent powder, banana powder, face wipes, cotton pads & buds, empty 10 & 20 g containers, disposables, mirror, eye makeup remover, 91% and 70% alcohol. Of course, a clean towel and first aid kit too!

Speaking of disposables, my order from Qosmedix came in! That's the company I order my tools from. I love them because the items are great quality and price. Can't wait to open it tomorrow, eeek! I am probable the only person on earth who would get excited about disposable anything! :)